Metal roofing has become increasingly popular in coastal North Carolina, offering durability against salt air, wind resistance during storms, and a lifespan that often exceeds traditional asphalt shingles by decades. But the performance of any metal roof depends almost entirely on how it's installed. Understanding the metal roof installation process helps homeowners know what to expect, what questions to ask contractors, and which details separate a roof that lasts 20 years from one that performs for 50. This guide walks through the essential steps, common decisions, and quality markers that matter most when installing a metal roof on your home.
Understanding Metal Roof Systems Before Installation
Metal roofing isn't a single product. The installation process varies significantly depending on which system you choose.
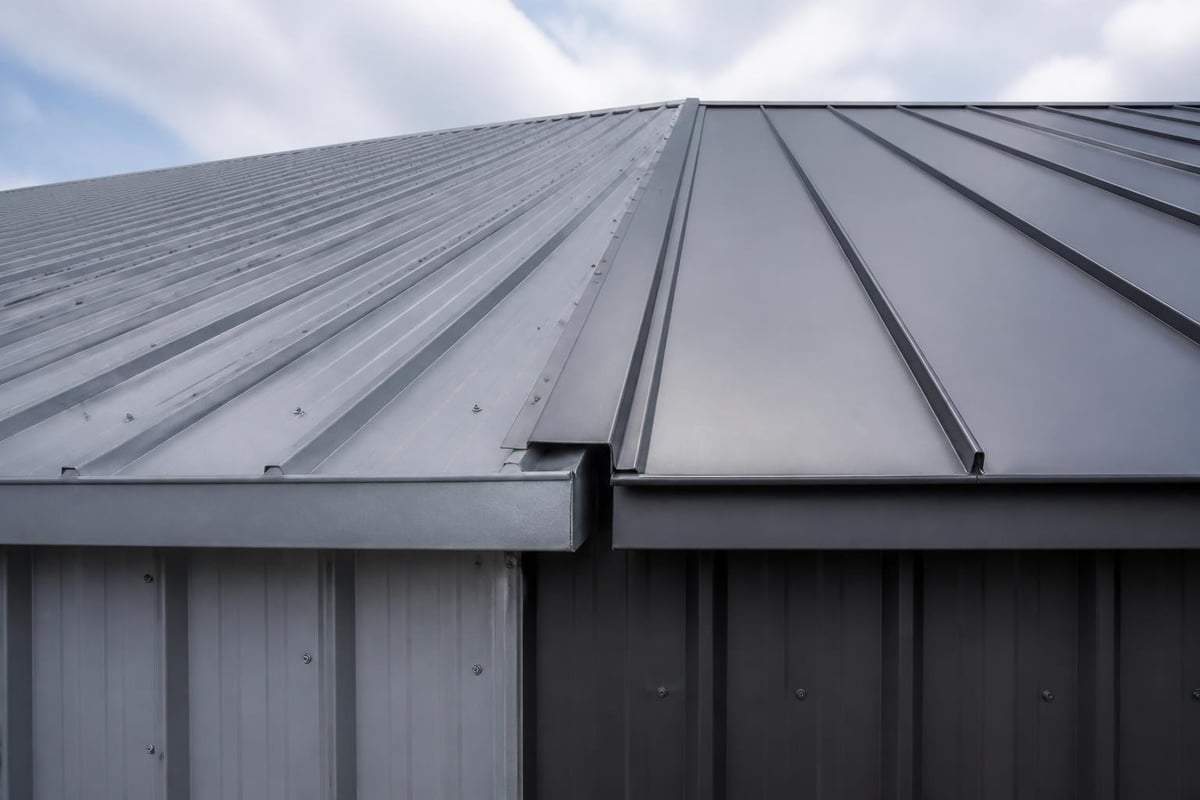
Exposed fastener panels are the most economical option. Fasteners go directly through the metal into the substrate, visible on the surface. These systems install faster and cost less upfront, but require more maintenance over time as fasteners can loosen or degrade.
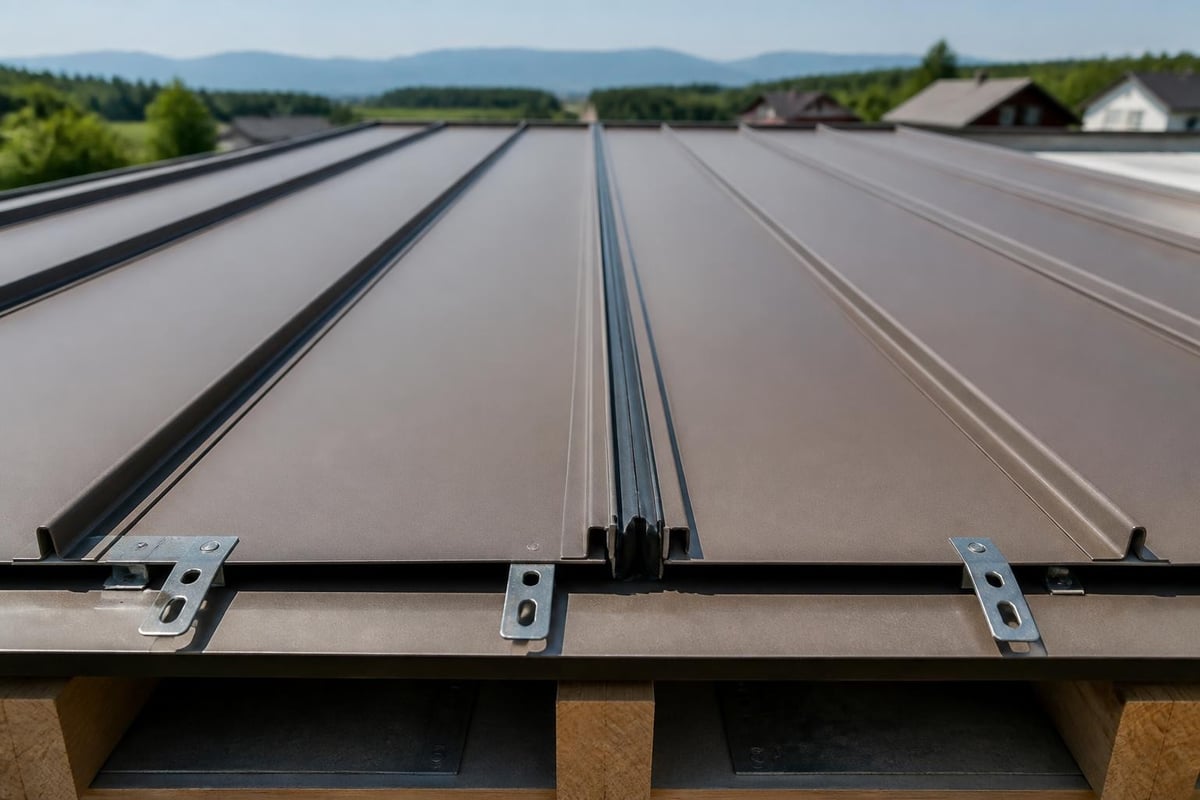
Standing seam systems use concealed clips that attach to the substrate. Panels snap or fold together, hiding all fasteners beneath the metal. This approach costs more initially but typically outlasts exposed fastener roofs and handles thermal expansion more effectively.
Choosing the Right Profile
- Corrugated panels (wavy pattern)
- R-panel (vertical ribbed design)
- Standing seam (raised vertical seams)
- Metal shingles (mimics traditional roofing)
- Stone-coated steel (metal with granular coating)
Each profile has different fastening requirements, expansion characteristics, and installation complexity. Standing seam roofs, for example, require specialized seaming tools and trained installers, while corrugated panels can sometimes be installed by experienced DIYers. The choice affects not just appearance but also how the roof handles coastal wind and thermal movement.
Preparing the Roof Deck for Metal Installation
The substrate must be solid, level, and properly spaced before any metal goes up. This step determines whether your panels lay flat or develop waves and gaps.
Most metal roof installation begins with inspecting the existing roof deck. Sheathing should be 5/8-inch plywood or 7/16-inch OSB at minimum. In coastal areas like Wilmington and Surf City, we often see older homes with spaced sheathing or damaged decking from previous leak issues. Metal roofing requires continuous substrate support, so gaps must be filled or the entire deck replaced.
Critical Substrate Requirements
| Component | Requirement | Why It Matters |
|---|---|---|
| Sheathing thickness | 5/8" min plywood | Prevents fastener pull-through |
| Panel spacing | 24" on center max | Ensures adequate support |
| Moisture content | Below 19% | Prevents warping after installation |
| Surface flatness | 1/4" in 10 feet | Eliminates panel waviness |
According to best practices for metal roof sheathing installation, proper fastening patterns in the deck itself prevent future movement that could stress the metal panels above. In hurricane-prone areas, this foundation becomes even more critical.
If you're dealing with an existing asphalt shingle roof, you have options. Some metal systems can install over one layer of shingles, which saves tear-off costs. However, this approach only works if the existing roof is flat, dry, and structurally sound. Any soft spots, previous leak damage, or uneven areas require removal and deck repair first.
Installing the Underlayment and Moisture Barrier
Even though metal roofing is waterproof, a proper underlayment provides backup protection and prevents condensation issues.
Synthetic underlayment has become the standard for metal roof installation. It's more durable than felt paper, won't tear during installation, and handles UV exposure better if the metal panels are delayed. The material also provides better slip resistance for workers, which matters during standing seam installations that require walking on steep slopes.
High-temperature underlayment is essential in coastal North Carolina. Standard synthetic materials can deteriorate when metal panels heat up in summer sun. The underlayment needs to withstand 240°F or higher without breaking down.
Underlayment Installation Steps
- Start at the eave, overlapping the drip edge by at least 2 inches
- Run horizontal courses with 6-inch side laps and 4-inch end laps
- Secure with cap nails or staples per manufacturer specs (typically 12 inches on center)
- Install additional ice and water shield in valleys and at penetrations
- Verify complete coverage before any metal goes up
Some installers skip proper underlayment to save time or cost. This creates risk. If wind-driven rain ever gets beneath the metal panels, or if condensation forms on the underside, that moisture needs a path out. Quality underlayment provides that secondary drainage plane.
Panel Layout and Thermal Expansion Planning
Metal expands and contracts with temperature changes. Installations that don't account for this movement develop problems within the first few years.
A metal roof in full sun can be 50-70°F hotter than the air temperature. A 40-foot panel might expand more than half an inch from winter to summer. Critical installation details like clip spacing and fastener specification determine whether this natural movement happens smoothly or causes buckling, fastener failure, and noise.
Panel orientation matters more than most homeowners realize. Panels should run perpendicular to the most common wind direction when possible. In coastal areas, this usually means running panels from ridge to eave rather than horizontally across the slope. This orientation also improves water drainage and reduces the chance of wind-driven rain penetrating seams.
Managing Thermal Movement
- Use slotted holes for fixed fasteners to allow lateral movement
- Space concealed clips according to manufacturer specs (typically 12-18 inches)
- Avoid over-tightening fasteners, which restricts expansion
- Install expansion joints on runs longer than 40 feet
- Use different fastening zones at eaves, field, and ridge
The proper attachment procedures for metal roofs emphasize that rigidly fastening panels prevents natural expansion, which leads to oil-canning (visible waviness), fastener back-out, and eventually leaks at penetration points.
Fastener Selection and Placement Technique
The fasteners holding your metal roof represent one of the most common failure points if chosen or installed incorrectly.
For exposed fastener systems, use only fasteners specifically designed for metal roofing. These include a neoprene or EPDM washer that compresses to seal around the fastener shaft. Standard roofing screws without proper washers will leak within months.
Fastener specs for coastal installations:
- #12 or #14 gauge minimum
- Stainless steel or coated to prevent corrosion
- 1-inch washer diameter minimum
- Length to penetrate substrate by at least 3/4 inch
- Matching color to panel finish
Placement is just as important as the fastener itself. Screws should go through the flat of the panel, not the high ribs, where they're more likely to leak. Drive them perpendicular to the roof surface, not at an angle. The washer should compress slightly but not deform. Over-driven fasteners crush the washer and create leak paths. Under-driven fasteners don't seal properly.
Standing seam installations avoid these issues by hiding fasteners entirely. Clips attach to the substrate, then the panel edges lock into the clips. This system costs more and requires special seaming equipment, but it eliminates the most common source of metal roof leaks.
Flashing Details That Prevent Leaks
Flashing around chimneys, skylights, vents, and walls determines whether your metal roof installation stays dry during coastal storms.
Metal roofing requires different flashing approaches than asphalt shingles. You can't rely on overlapping layers the same way. Instead, each transition needs formed metal flashing that directs water away from the joint.
Critical Flashing Locations
| Area | Flashing Type | Key Detail |
|---|---|---|
| Eaves | Drip edge | Must extend beyond fascia |
| Ridge | Ridge cap | Ventilated or solid based on attic design |
| Valleys | W-valley or closed cut | Min 24-gauge, 18" wide |
| Chimneys | Counter flashing | Reglet cut into masonry |
| Walls | Step flashing | Integrated with panel seams |
| Penetrations | Pipe boots | High-temp EPDM or metal |
Valleys deserve special attention. A W-valley uses formed metal that sits above the roof deck, allowing water to flow beneath the panels. This works well but requires precise panel cuts. Closed-cut valleys have panels overlapping directly in the valley center, which looks cleaner but requires perfect sealant application.
Many metal roof installation guides emphasize that flashing should always be the same material as the roofing panels, or more noble in the galvanic series. Mixing metals, like using galvanized flashing with aluminum panels, causes corrosion at contact points.
At NC Roofs, we see storm damage most often where flashing wasn't properly integrated during the original installation. Wind-driven rain finds any gap between flashing and substrate. In Topsail and Surf City, where tropical systems bring sustained wind and hours of rain, those gaps become major leak sources. Understanding proper flashing technique matters just as much as the panel installation itself, which is why we focus on these details during roof repair consultations.
Ventilation Integration With Metal Roofing
Metal roofs perform better and last longer when the attic space beneath stays properly ventilated.
Unventilated attics can reach 150°F in summer, which increases cooling costs and accelerates aging of the metal panels from beneath. Proper airflow also prevents moisture accumulation that leads to condensation on the underside of the metal.
Ventilation options for metal roofs:
- Ridge vents specifically designed for metal profiles
- Gable vents at each end of the attic
- Soffit vents for intake air
- Powered attic fans (though passive ventilation is usually sufficient)
- Through-panel vents for specific exhaust points
The ventilation ratio should be at least 1 square foot of net free area per 150 square feet of attic space. In hot, humid coastal climates, more ventilation is better. Ridge vents work well with metal roofing because they integrate cleanly with the ridge cap installation and maintain the roof's clean lines.
Some metal panel profiles include built-in ventilation channels that promote airflow between the panel and underlayment. This reduces heat transfer to the attic and helps any moisture that gets beneath the panels dry out quickly.
Seaming and Panel Connection Methods
How panels connect to each other determines water resistance and long-term durability.
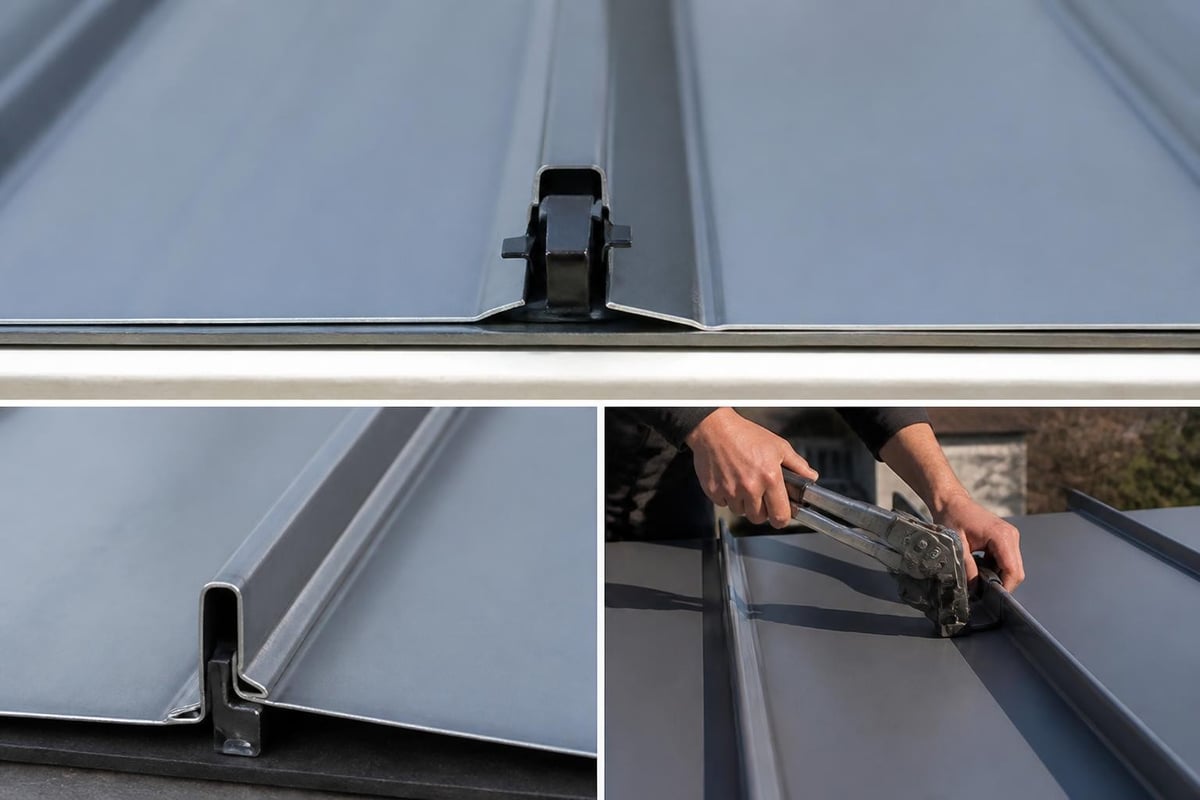
Standing seam panels use mechanical seaming that folds the panel edges together. This requires a seaming tool that travels along the joint, progressively crimping the metal into a weathertight connection. Single-lock seams fold once. Double-lock seams fold twice, creating a stronger, more weather-resistant joint preferred in high-wind coastal areas.
The seaming process must be consistent. Irregular seaming creates weak points where panels can separate during wind events. Each seam should engage fully along its entire length, with no gaps or incomplete folds. Professional installation tips stress that proper seam engagement is one of the five factors that differentiate a mediocre installation from an excellent one.
Seam Quality Indicators
- Uniform height along entire run
- Complete engagement with no visible gaps
- Smooth finish without kinks or bends
- Proper clip spacing preventing panel movement
- Consistent appearance from ridge to eave
Exposed fastener panels overlap at the ribs or edges, with sealant between layers. This sealant must be compatible with the panel coating and rated for continuous water immersion. Butyl-based sealants typically perform better than silicone in these applications.
Ridge Cap and Trim Installation
The ridge cap protects the roof peak and completes the weatherproofing system.
Ridge caps must account for thermal expansion just like the field panels. They typically install with exposed fasteners even on standing seam systems, but the fasteners go through pre-punched slots that allow movement. Over-tightening these fasteners causes buckling as the cap expands and contracts.
Trim pieces finish all roof edges. Each serves a specific purpose:
- Eave trim (drip edge) channels water away from fascia
- Rake trim finishes gable ends
- Valley trim (when used) protects valley centers
- Endwall trim seals where roof meets vertical walls
- Sidewall trim handles sloped wall intersections
All trim should be the same gauge as the roofing panels or heavier. Thin trim flexes in wind, creating noise and potentially allowing water intrusion. Corners and joints between trim pieces need sealant or lap at least 3 inches to prevent wind-driven rain from working underneath.
Working Around Roof Penetrations
Every penetration through a metal roof is a potential leak if not detailed correctly.
Plumbing vents, electrical masts, and HVAC vents all require custom flashing. For round penetrations, specialized pipe boots with metal bases and EPDM sleeves work well. The metal base should integrate beneath the upslope panel and overlap the downslope panel. This creates proper water flow around the penetration.
Penetration flashing sequence:
- Install the downslope panel past the penetration location
- Position the flashing boot, sliding beneath the upslope panel
- Seal the boot base to the panel with compatible sealant
- Install the upslope panel over the boot base
- Trim the EPDM sleeve to fit snugly around the pipe
- Secure the sleeve with the integrated clamp
Large penetrations like chimneys or skylights need custom fabricated flashing. This typically involves step flashing along the sides, head flashing at the top, and a cricket (diverter) on the upslope side to split water around the obstruction. These details require sheet metal fabrication skills and careful measurement.
Quality Control During Installation
Knowing what to inspect helps homeowners verify their metal roof installation meets proper standards.
Walk the site daily if possible. Look for proper panel alignment, consistent fastener spacing, and clean work areas. Metal roofing generates sharp scraps and cut ends that should be collected and removed daily to prevent rust staining and injury.
Installation Quality Checklist
| Checkpoint | What to Verify |
|---|---|
| Substrate | Solid, dry, properly fastened |
| Underlayment | Complete coverage, proper laps |
| Panel alignment | Straight runs, consistent reveals |
| Fasteners | Proper type, spacing, and drive depth |
| Flashing | Correct material, lapped properly |
| Seams | Full engagement, uniform appearance |
| Ventilation | Adequate airflow, unobstructed |
| Cleanup | All scraps removed, no metal debris |
Many metal roof problems stem from installation errors that were visible during the work but got covered by subsequent layers. For example, improperly lapped underlayment won't be visible once panels are installed, but it creates leak paths during the roof's first storm.
Reputable contractors welcome questions and site visits. If an installer discourages you from observing the work, that's a warning sign. Quality installations are performed confidently with nothing to hide.
Weatherproofing and Sealant Application
Sealant fills the gaps that mechanical fastening can't eliminate.
Use only sealants specifically rated for metal roofing. These formulas remain flexible across temperature extremes and adhere to painted metal surfaces. Butyl-based sealants generally outperform silicone for panel-to-panel joints and underlayment sealing.
Apply sealant in continuous beads without gaps. A common mistake is putting intermittent dabs rather than a full bead, which leaves channels for water to follow. The bead should be thick enough to fill the joint but not so excessive that it squeezes out and creates a messy appearance.
Where sealant is essential:
- Between overlapping panel edges on exposed fastener systems
- Under Z-closures and trim pieces
- Around penetration flashings
- At endwall and sidewall transitions
- Under ridge caps (when specified by manufacturer)
Some installers over-rely on sealant to compensate for poor flashing design. Sealant is a backup, not the primary waterproofing. Proper metal roof installation creates water-shedding surfaces through correct lapping and panel orientation. Sealant fills the small gaps that remain.
Final Inspection and Long-Term Performance
A properly installed metal roof should show certain characteristics immediately after completion.
Panels should lie flat without oil-canning or waviness. Standing seam roofs should have uniform seam heights and clean, straight runs from ridge to eave. Exposed fastener roofs should show consistent screw patterns with all washers compressed evenly.
From ground level, look for alignment. Do the panels run parallel to the ridge? Are the reveals between standing seams consistent? Does the roof have a clean, professional appearance without visible irregularities?
Walk the roof if safe (or have your inspector do so). Check for loose fasteners, unsealed laps, or debris trapped between panels. Verify that all penetrations are properly flashed and that trim pieces are secure.
Metal roofing should be quiet during rain. If you hear ticking or popping sounds as the roof heats and cools, panels may be too rigidly fastened, preventing normal thermal movement. This often indicates improper fastener technique that will cause problems over time.
The various application methods for metal roofs each have specific performance characteristics, but all should deliver decades of service when installed correctly. In coastal areas like Hampstead and Holly Ridge, properly installed metal roofs regularly outperform asphalt shingles by 30 years or more, making the higher initial investment worthwhile for most homeowners.
Metal roof installation involves multiple critical steps that each affect how long your roof lasts and how well it performs. From substrate preparation through final trim details, quality at each stage determines whether you get 25 years or 50 years from your investment. If you're considering a metal roof for your coastal North Carolina home or need an honest assessment of your current roof's condition, NC Roofs provides clear guidance and quality work without unnecessary upsells. We're here to help you understand your options and make the right decision for your home.