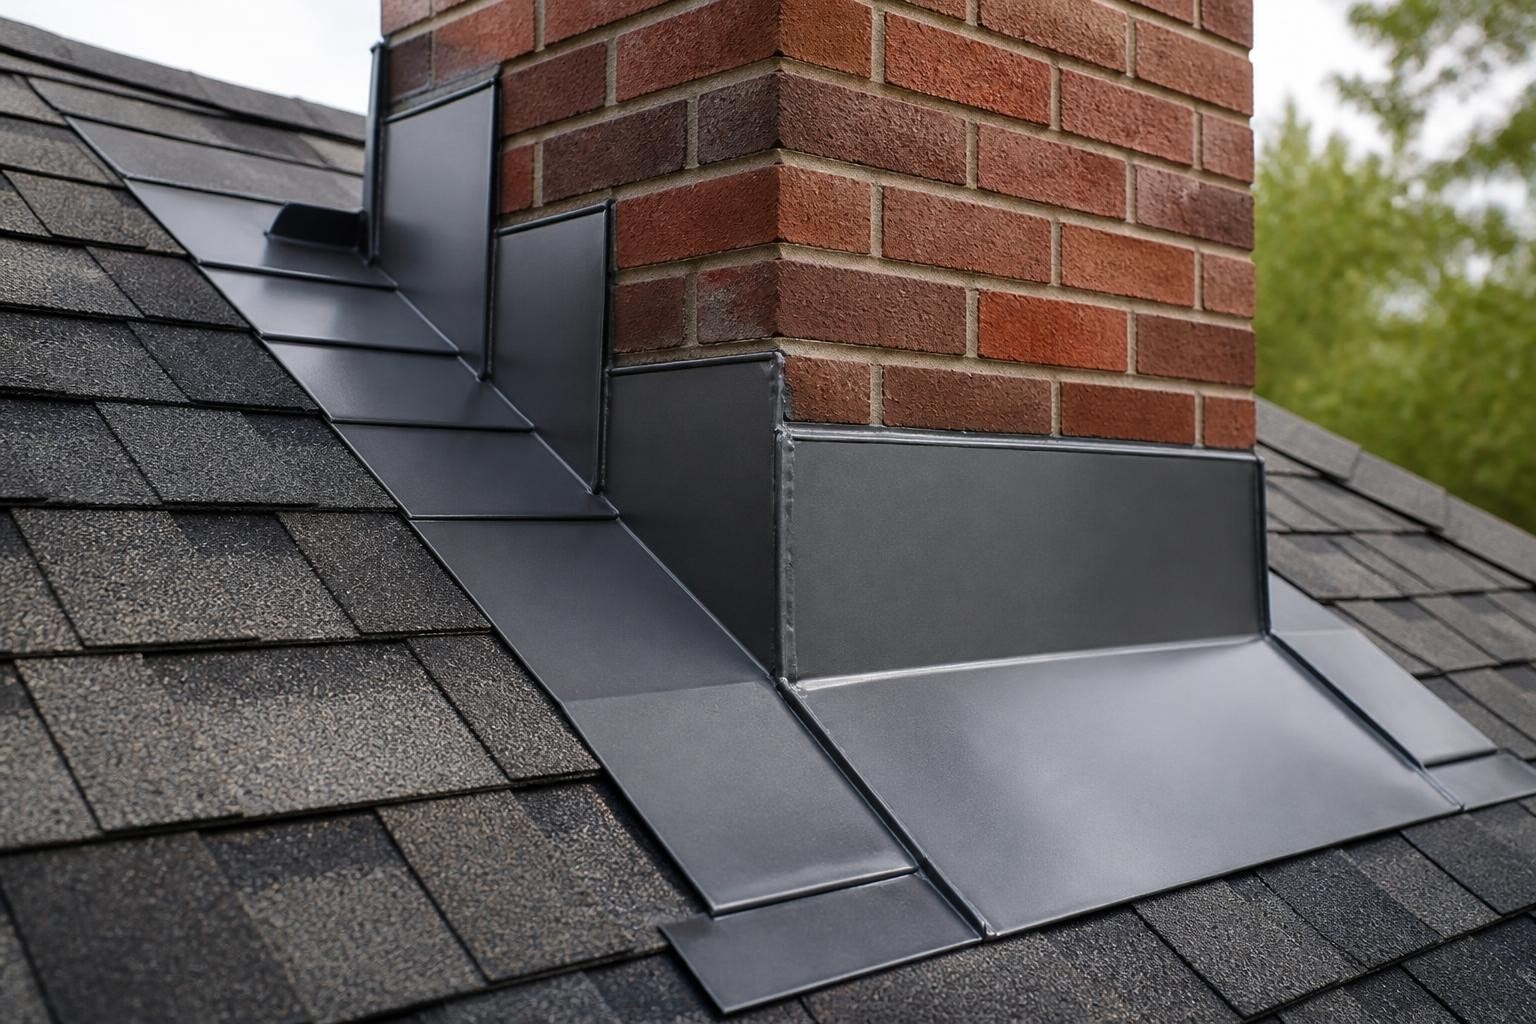
Chimney flashing is one of the most common sources of roof leaks, yet many homeowners don't realize it exists until water starts showing up inside their home. This thin barrier of metal keeps water from seeping in where your chimney breaks through the roof plane, a vulnerable intersection that sees constant exposure to wind, rain, and thermal movement. When chimney flashing fails, even a sound roof and solid chimney can leak, leading to stains, rot, and confusion about where the problem actually started. Understanding how this system works and what proper chimney flashing repair involves helps you address leaks early and avoid larger damage down the road.
What Chimney Flashing Actually Does
Flashing serves as the transition between two different building materials: your roof deck and shingles on one side, your masonry chimney on the other. Because chimneys don't flex or move with the roof, and because they shed water differently than sloped shingles, a simple seal won't hold. Instead, flashing creates a multi-layered barrier that directs water away from the chimney base and onto the surrounding roof surface.
The system typically includes two main components:
- Step flashing – individual L-shaped pieces woven between shingle courses along the chimney sides
- Counter flashing – metal embedded into or mounted against the chimney masonry, overlapping the step flashing below
This layered approach allows small amounts of movement between the roof and chimney without breaking the seal. Water that hits the chimney runs down the masonry, strikes the counter flashing, and flows onto the step flashing below, which channels it over the shingles and off the roof. When one layer fails, water finds a path straight to the roof deck.
Where Flashing Sits on Your Roof
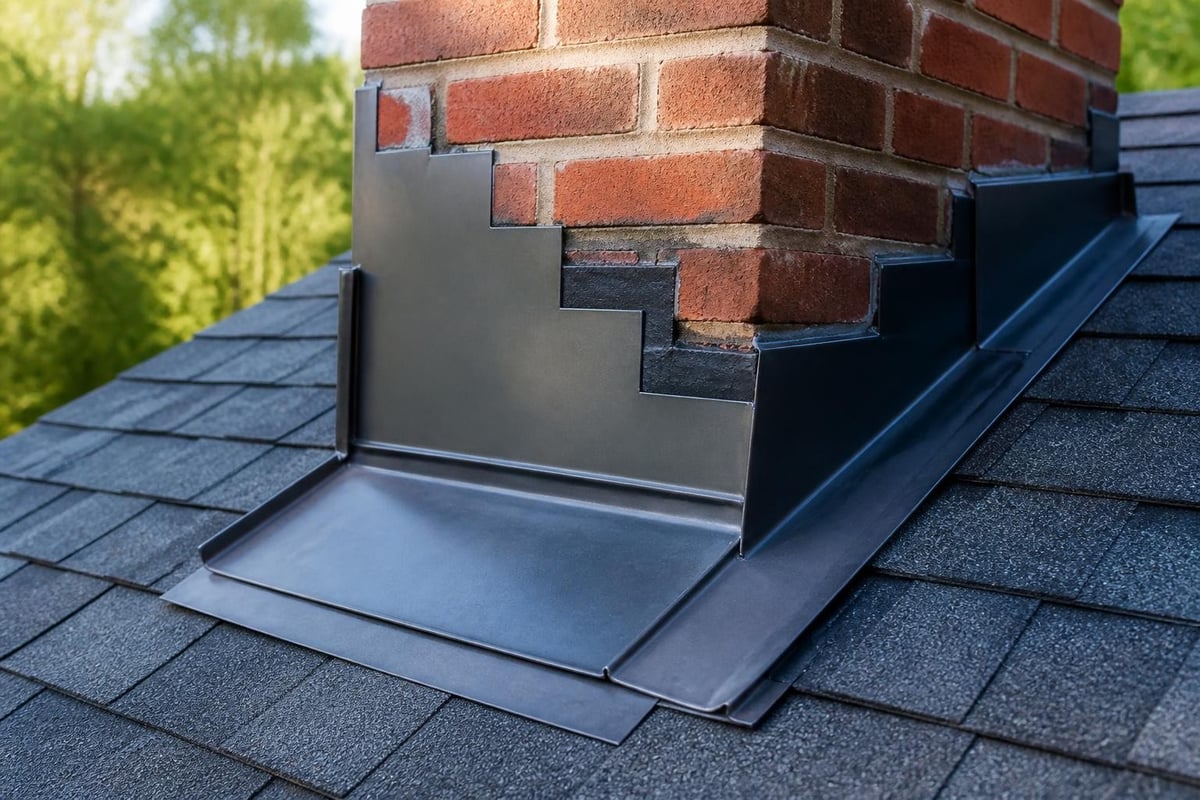
Chimney flashing wraps around all four sides of the chimney, but the method changes depending on which side you're looking at. The upslope side (where water flows down toward the chimney) often uses a single apron piece or a cricket – a small peaked diverter that splits water to either side. The downslope side gets a simple apron that tucks under shingles above and laps over shingles below. The two side walls receive step flashing, installed one piece per shingle course so the flashing rises with the roof slope.
Counter flashing typically tucks into a mortar joint or reglet cut into the masonry, then bends down to cover the step flashing by at least two inches. This overlap is what keeps wind-driven rain from sneaking behind the base flashing. On older homes, you might see counter flashing simply nailed or caulked to the chimney face, a less durable method that requires more frequent maintenance.
Common Causes of Chimney Flashing Failure
Flashing doesn't usually fail overnight. Most leaks develop over years as small vulnerabilities turn into larger openings. Recognizing the early signs means you can schedule chimney flashing repair before water damages framing or drywall inside your home.
| Cause | What Happens | What You'll See |
|---|---|---|
| Sealant breakdown | Caulk around counter flashing cracks and shrinks | Visible gaps, rust stains, missing sealant beads |
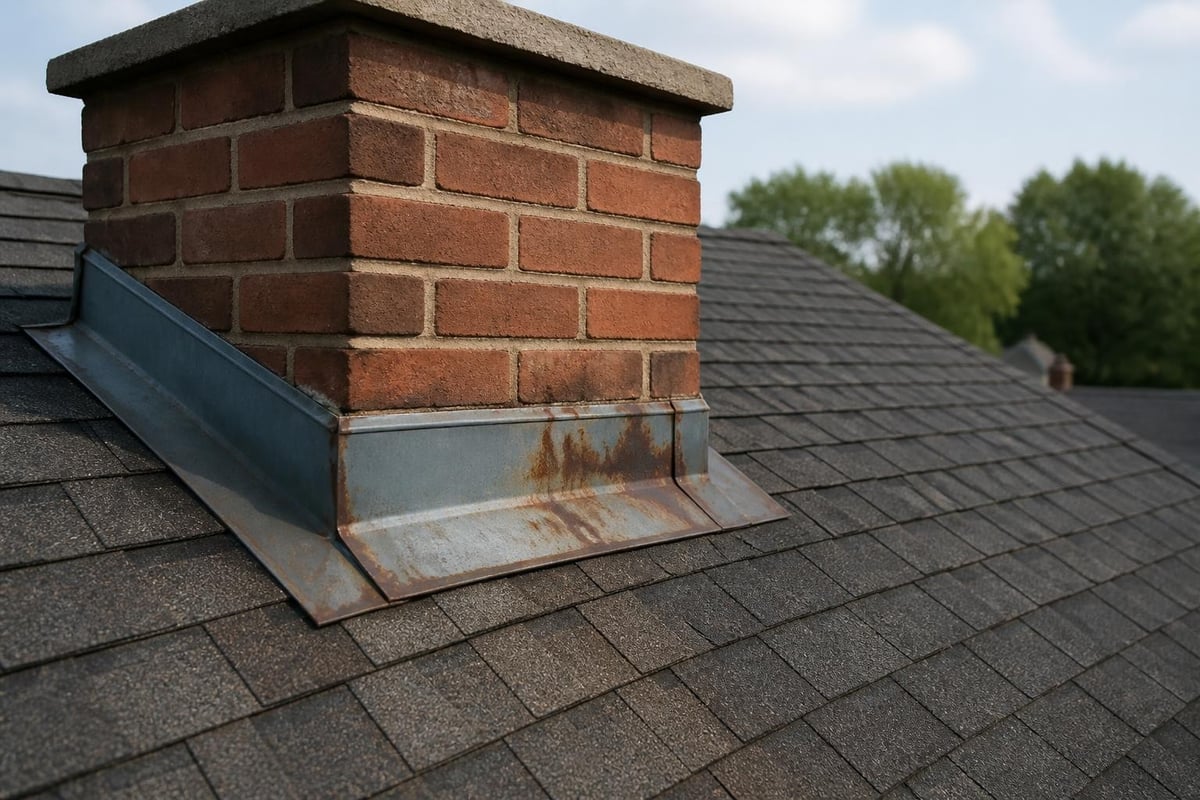
| Corrosion | Galvanized steel or aluminum oxidizes, develops holes | Orange or white corrosion, pinholes, thin spots |
| Mortar joint erosion | Brick mortar deteriorates, counter flashing loosens | Loose metal, exposed joint, flashing pulling away |
| Improper installation | Missing pieces, wrong overlaps, no step flashing | Visible nail heads, gaps, flashing under instead of over shingles |
| Storm or wind damage | High winds lift or crease flashing | Bent metal, exposed fasteners, lifted edges |
In coastal North Carolina, salt air accelerates corrosion on any exposed metal. Galvanized flashing that might last 25 years inland can show rust in 15 years near the ocean. Homes in Topsail, Surf City, and Holly Ridge often see faster flashing degradation simply due to proximity to saltwater and higher humidity. That doesn't mean flashing should leak after a decade, but it does mean inspections matter more in coastal areas.
Signs You Need Chimney Flashing Repair
Interior clues often show up first:
- Water stains on the ceiling near the chimney
- Damp or discolored drywall around the fireplace
- Musty odor near the chimney, especially after rain
- Dripping or pooling water during or right after storms
Exterior signs confirm the source:
- Rust streaks running down the chimney face
- Gaps between flashing and brick
- Missing or visibly damaged flashing pieces
- Lifted shingles near the chimney base
A roof leak near your chimney doesn't always mean the flashing is at fault. Sometimes the chimney crown (the concrete or mortar cap at the top) cracks and lets water into the flue or masonry, which then weeps out near the base and mimics a flashing leak. Other times a nearby roof valley or vent fails, and water tracks along framing until it appears near the chimney. A thorough inspection separates flashing problems from other roof or chimney issues so you're repairing the right thing. The Chimney Safety Institute of America provides homeowner resources that explain common chimney leak sources and when to call in specialists.
What Proper Chimney Flashing Repair Involves
Repairing chimney flashing isn't just slapping new caulk around the edges. Effective repairs restore the multi-layer waterproof system, which often means removing and replacing metal, re-cutting mortar joints, and properly integrating flashing with the surrounding shingles.
Assessment and Planning
Before any metal gets pulled, a qualified roofer inspects the full perimeter of the chimney, checking counter flashing embedment, step flashing condition, sealant integrity, and whether the chimney structure itself is sound. Loose bricks, deteriorated mortar, or a failing chimney crown need to be addressed before flashing repair, because a stable chimney is essential for long-lasting flashing.
The roofer also checks how the existing flashing was installed. Was step flashing used, or did someone just run a continuous strip up the side? Is the counter flashing embedded in a mortar joint or just caulked to the face? Does a cricket divert water on the upslope side, or is there just a flat apron? Understanding what's there helps determine whether you need a full replacement or targeted repair.
Many homeowners benefit from starting with a detailed roof assessment that documents the current condition and explains repair options. NC Roofs Roof Reports walk through these findings with photos and clear recommendations, so you understand exactly what needs attention before any work begins.
Removing Old Flashing
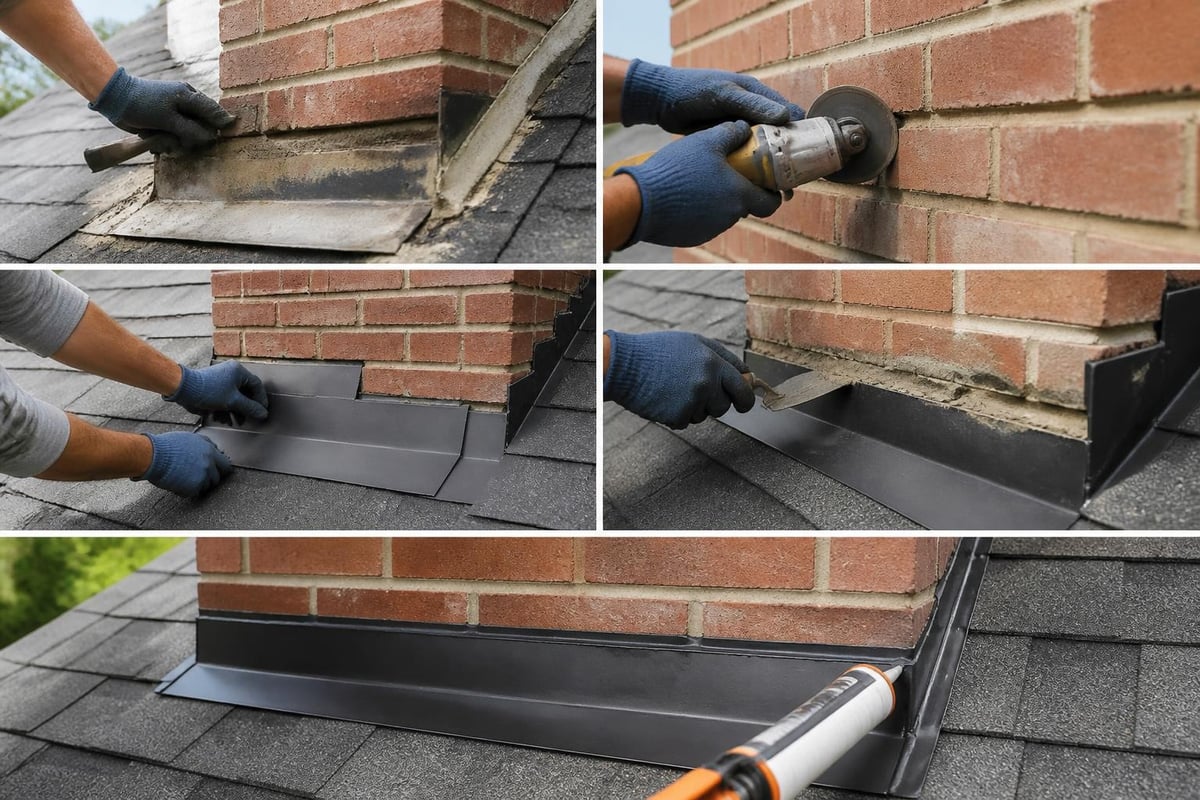
If the existing flashing is corroded, improperly installed, or missing pieces, partial repairs won't hold. Full removal means carefully pulling counter flashing out of mortar joints (or off the chimney face), then lifting the roofing around the chimney to access step flashing underneath.
Key steps during removal:
- Photograph the existing installation so you have a reference for how pieces overlap
- Lift shingles gently to avoid breaking tabs, especially on older roofs
- Cut out deteriorated flashing without damaging sound masonry or roof deck
- Inspect the roof deck and chimney masonry for hidden rot or damage
Once old flashing is out, the roofer can see if there's any water damage to the roof sheathing or if the chimney needs tuckpointing before new flashing goes in. Skipping this inspection means you might install perfect flashing over rotted wood, which just postpones the next leak.
Installing New Step and Counter Flashing
New step flashing gets installed one piece at a time, starting at the bottom of each side and working upward. Each piece sits on top of a shingle, then the next shingle course covers it. This woven approach keeps water moving downslope and prevents any single point of failure from causing a leak. The National Roofing Contractors Association guidelines detail these overlaps and materials standards, which professional roofers follow to ensure durable results.
Counter flashing installation depends on your chimney construction. For brick chimneys, the roofer cuts a shallow groove (reglet) into a mortar joint, inserts the top edge of the counter flashing, and seals the joint with mortar or a high-quality polyurethane sealant. The bottom edge of the counter flashing laps over the step flashing by at least two inches. For stone or concrete-block chimneys, surface-mount counter flashing with mechanical fasteners may be used, though embedment is stronger when feasible.
| Flashing Component | Material Options | Typical Lifespan |
|---|---|---|
| Step flashing | Aluminum, galvanized steel, copper | 15-50+ years depending on material and environment |
| Counter flashing | Aluminum, stainless steel, copper, lead-coated copper | 20-50+ years |
| Sealants | Polyurethane, silicone (for metal-to-masonry joints) | 5-15 years, periodic resealing needed |
Copper flashing costs more upfront but lasts the longest and resists coastal corrosion better than galvanized steel. Aluminum offers a middle ground between cost and durability. Many roofers in Eastern North Carolina recommend stainless steel or copper for homes near the ocean, where salt air shortens the life of standard galvanized materials.
Cricket Installation on Larger Chimneys
Chimneys wider than about 30 inches create a dam on the upslope side, where water and debris collect rather than flowing around. A cricket (also called a saddle) solves this by building a small peaked diverter behind the chimney that splits water to either side before it reaches the chimney base.
Crickets involve:
- Framing a small peaked structure against the chimney
- Sheathing and waterproofing the cricket deck
- Integrating cricket flashing with chimney step and counter flashing
- Ensuring proper shingle coverage so the cricket blends with the roof
Not every chimney needs a cricket, but skipping one on a large chimney invites ice dams in winter and standing water after heavy rain. If your chimney is wide and you've had persistent leaks on the upslope side, adding a cricket during flashing repair often ends the problem for good. The U.S. Department of Energy Building America Solution Center offers practical guidance on flashing roof penetrations, including when crickets improve water management.
Repair vs. Replacement: What Makes Sense
Not every flashing problem requires tearing everything out. Sometimes counter flashing just needs new sealant, or a single section of step flashing can be replaced without touching the rest. Other times the entire system is compromised, and patching one area just delays the inevitable.
When Targeted Repair Works
Small, localized issues that respond well to repair:
- Gaps in sealant around counter flashing
- One or two pieces of damaged step flashing
- Loose counter flashing that can be re-embedded
- Minor corrosion on otherwise sound metal
If the underlying roof is in good shape and most of the flashing still functions, targeted chimney flashing repair buys you years without the cost of a full replacement. A skilled roofer can blend new pieces with old, maintain proper overlaps, and restore the waterproof barrier without disturbing the entire perimeter.
When Full Replacement Is the Right Call
Conditions that call for complete flashing replacement:
- Widespread corrosion or rust-through
- Missing step flashing or improper original installation
- Roof replacement that exposes all flashing anyway
- Chimney masonry repairs that require flashing removal
Trying to patch heavily corroded flashing is like putting a bandage on a sieve. You might stop one leak, but another opens up weeks later. Full replacement costs more upfront but eliminates the cycle of repeated small repairs, and it's often the only way to integrate modern materials and techniques that meet current building standards. For more details on architectural metal flashing best practices, the NRCA Guidelines for Architectural Metal Flashings provide detailed industry guidance used by professional roofers.
Costs and What to Expect
Chimney flashing repair costs vary based on chimney size, roof pitch, accessibility, and the extent of the work. A simple counter-flashing reseal might run a few hundred dollars. Full replacement on a standard chimney typically falls between $800 and $1,500, though larger chimneys, steep roofs, or the addition of a cricket can push costs higher.
Cost factors include:
- Chimney size – more perimeter means more flashing, more labor
- Roof pitch – steep roofs require staging, safety equipment, slower work
- Material choice – copper costs significantly more than aluminum or galvanized steel
- Extent of masonry work – cutting reglets or tuckpointing adds masonry labor
- Roof condition – if surrounding shingles are brittle or damaged, replacement expands
The cheapest option is rarely the best. Flashing installed with proper overlaps, durable materials, and integrated counter flashing lasts decades. Flashing caulked to the chimney face without embedment might cost half as much but fails in five years, leading to repeated service calls and water damage that dwarfs the original savings.
When you request a quote, ask what materials will be used, whether counter flashing will be embedded or surface-mounted, and if a cricket is recommended. A detailed estimate breaks down materials, labor, and any chimney repairs needed before flashing goes in, so there's no confusion about what you're paying for. You can explore options further at NC Roofs or review their full service approach at ncroofs.com/page-sitemap.xml.
Choosing the Right Contractor
Chimney flashing repair sits at the intersection of roofing and masonry work. Not every roofer is comfortable cutting mortar joints, and not every mason understands roof water flow. The best results come from contractors who handle both sides of the equation or who coordinate closely between trades.
Questions to Ask Before Hiring
- Do you install step flashing or just apron flashing around chimneys? (Step flashing is correct for side walls)
- Will counter flashing be embedded in mortar joints or surface-mounted? (Embedment is more durable)
- What materials do you recommend for coastal environments? (Copper or stainless resist salt air)
- Can I see examples of past chimney flashing work? (Photos or references confirm experience)
- What warranty covers the flashing and labor? (At least a few years on labor, longer on materials)
A contractor who explains the process, discusses material options, and points out related issues (like a cracked chimney crown or missing cricket) demonstrates depth of knowledge. Someone who offers to "seal it up real quick" without examining the full system probably isn't equipped for lasting repair.
In Eastern North Carolina, coastal conditions demand slightly different approaches than you'd see inland. Contractors familiar with Wilmington, Hampstead, and the Topsail area understand salt-air corrosion, higher wind exposure, and the moisture challenges that come with proximity to the ocean. Local experience matters when choosing flashing materials and installation details that hold up long-term.
Maintenance After Repair
Once chimney flashing repair is complete, occasional checks keep the system working as intended. Flashing doesn't need constant attention, but a quick look once or twice a year catches small problems before they turn into leaks.
Simple maintenance steps:
- Inspect sealant joints annually and re-caulk if gaps appear
- Check for rust or corrosion, especially on galvanized flashing in coastal areas
- Clear debris from behind the chimney (leaves, pine needles) that can trap moisture
- Look for lifted or damaged shingles around the chimney base after storms
- Monitor interior ceilings near the chimney for any new stains or dampness
Sealant typically needs refreshing every 5 to 10 years, even if the metal flashing itself is sound. A small tube of polyurethane sealant and ten minutes of work can extend the life of your flashing by years. If you're not comfortable climbing onto your roof, schedule a periodic roof inspection with a local contractor who can check flashing condition along with the rest of your roof.
The U.S. Environmental Protection Agency’s moisture control guidance emphasizes the role of flashing in preventing long-term moisture damage, reinforcing why ongoing attention to these details protects more than just your roof.
When to Call for a Follow-Up Inspection
Even well-installed flashing can develop issues over time. If you notice any of the warning signs below, schedule an inspection rather than waiting for a leak to worsen:
- Visible gaps or separations in the flashing
- New rust stains or corrosion
- Interior water stains that weren't there before
- Recent severe storms or high winds
- Planned roof replacement in the near future
Catching problems early means repairs stay small and affordable. Ignoring them leads to rot, mold, and structural damage that costs far more to fix than the flashing itself.
Why Proper Flashing Matters Long-Term
Chimney flashing might seem like a minor detail in the overall roof system, but it's one of the most common failure points. A leaking chimney can drip water into wall cavities, where it rots framing and insulation unseen for months. By the time you see a stain on the ceiling, the damage behind the drywall is often extensive.
Proper chimney flashing repair stops that cycle. It restores the multi-layer defense that keeps water on the outside, protects your home's structure, and gives you confidence that your roof is doing its job. Whether you're dealing with a minor sealant gap or planning a full flashing replacement, understanding how the system works helps you make decisions based on real conditions rather than guesswork.
For more perspective on how counter flashing design and installation impact durability, the IIBEC article “Where Has All the Counterflashing Gone?” explores industry practices and why proper counter flashing remains essential to long-lasting chimney weatherproofing.
Chimney flashing repair protects one of the most vulnerable points on your roof, and getting it right means years of dry ceilings and peace of mind. If you're seeing leaks near your chimney or just want to understand your roof's current condition, NC Roofs provides honest assessments and clear repair options across Hampstead, Wilmington, and the surrounding coastal communities. We'll walk you through what's happening, what needs attention, and what makes sense for your home, so you can make confident decisions without the pressure.