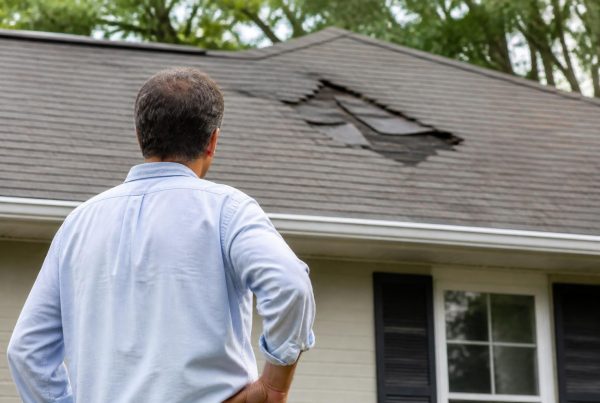
Roofing construction involves far more than nailing shingles to plywood. It's a layered system where each component plays a specific role in protecting your home from water, wind, and weather extremes. Whether you're building new or replacing an existing roof, understanding how roofing construction works helps you make informed decisions about materials, contractors, and long-term maintenance. This guide walks through the essential stages, common methods, and practical considerations that separate a solid roof from one that leads to problems down the road.
Understanding the Roofing Construction Process
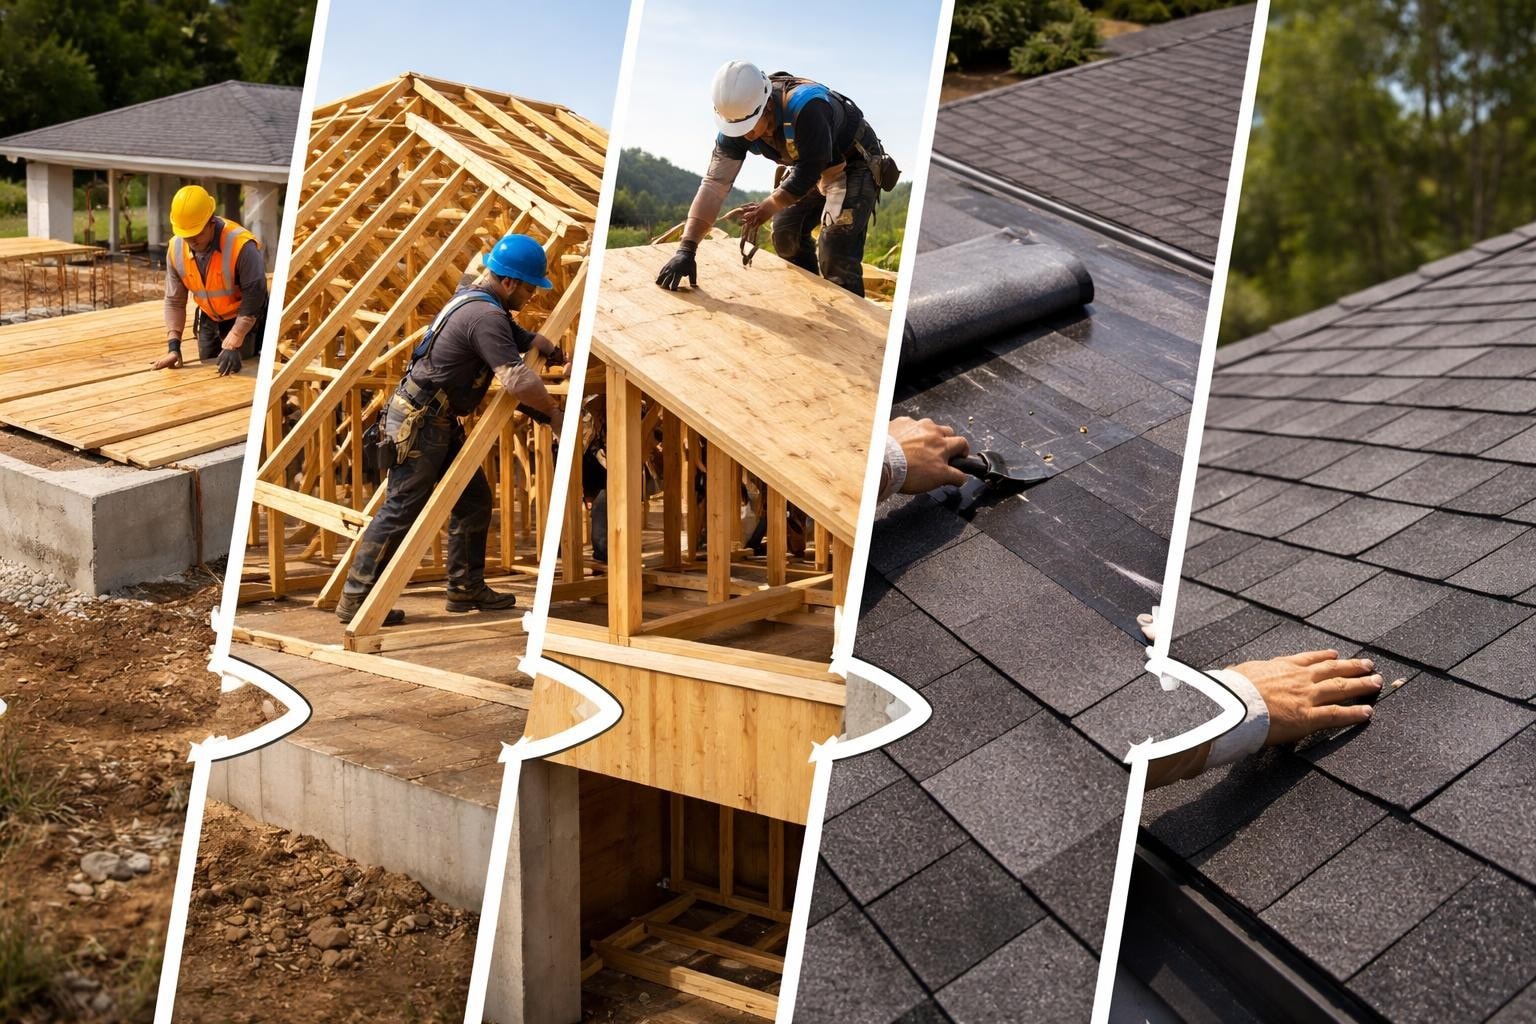
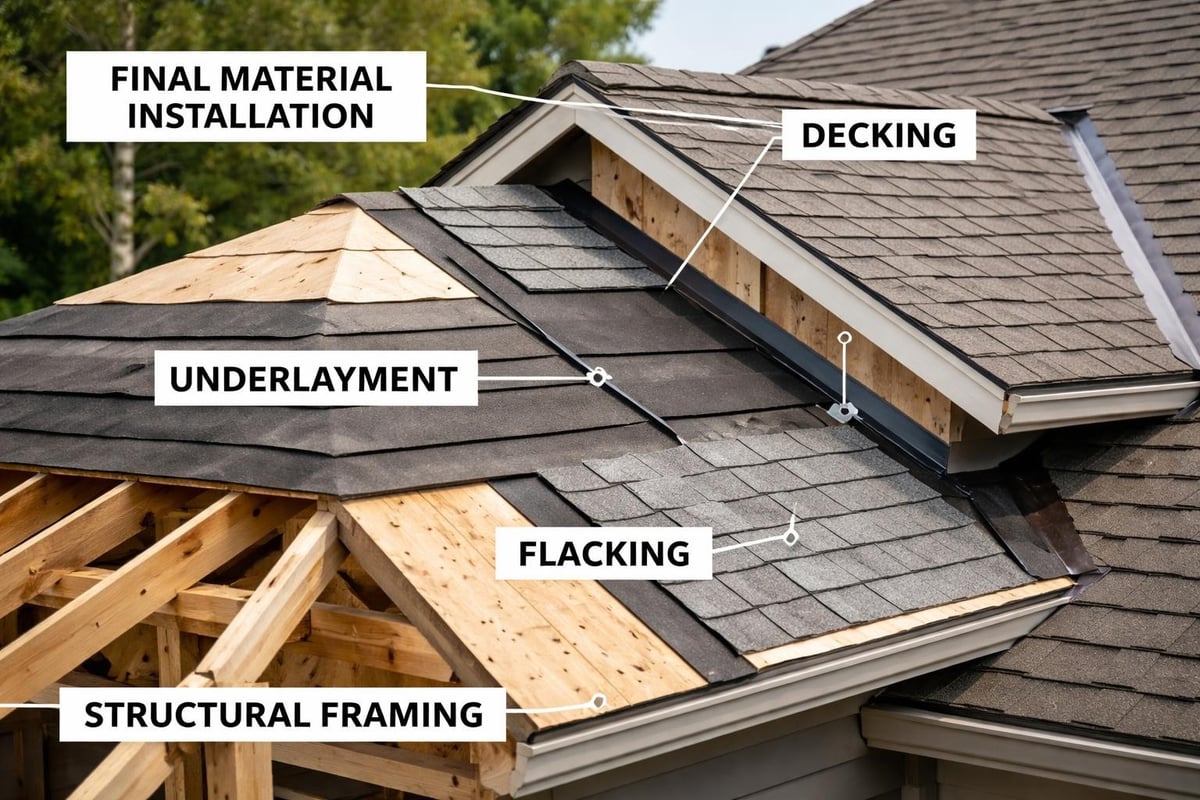
Roofing construction follows a specific sequence that builds from the structural frame outward. The process begins with roof framing, where rafters or trusses create the slope and shape. Next comes roof decking, typically plywood or oriented strand board (OSB), which forms the solid base. After decking, contractors install underlayment as a water-resistant barrier, followed by drip edges and flashing around penetrations and valleys.
The final layer is the roofing material itself, whether asphalt shingles, metal panels, or tile. Each layer depends on the one beneath it being installed correctly. Skip a step or rush through installation, and water finds a way in.
Key Stages in Order
- Framing and structural support – rafters or trusses set the slope
- Decking installation – solid sheathing anchors everything
- Underlayment application – barrier against water infiltration
- Flashing and edge details – seals vulnerable transitions
- Final roofing material – visible protection layer
- Ridge vents and ventilation – controls attic temperature and moisture
This sequence applies whether you're working on a simple gable roof or a complex hip design with multiple valleys. The principles remain the same: build from structure to surface, seal transitions, and ensure proper drainage.
Framing Methods and Structural Considerations
Roof framing determines both the look of your home and how the roofing construction will proceed. Two main approaches dominate residential work: stick framing and truss systems. Stick framing involves cutting and assembling individual rafters on-site, allowing for custom designs and modifications. Trusses arrive prefabricated and engineered, speeding up installation while limiting attic space.
Stick framing advantages:
- Custom ceiling heights and angles
- Full attic access for storage or conversion
- Easier to modify during construction
- Better for complex roof designs
Truss system advantages:
- Faster installation (often one day)
- Engineered for specific load requirements
- Consistent quality control
- Lower labor costs
The framing method affects how contractors approach decking and underlayment. Trusses typically require closer attention to alignment since they're spaced precisely. Stick framing offers more flexibility but demands careful measurement to maintain consistent slopes. Both methods work well when installed according to proper roof system design standards, which address load calculations, material specifications, and connection requirements.
Eastern North Carolina faces specific challenges with wind loads and moisture. Framing must account for hurricane-force winds, which means stronger connections between rafters and walls. Many local codes now require hurricane straps or clips at every connection point, not just perimeter areas.
Decking and Underlayment Fundamentals
Roof decking serves as the foundation for everything above it. Most residential roofing construction uses 7/16-inch or 1/2-inch OSB, though plywood remains popular in areas with high moisture exposure. The decking must span between rafters without sagging and provide enough holding power for nails or staples.
Proper spacing matters. Decking panels should have 1/8-inch gaps to allow for expansion during temperature changes. Panels run perpendicular to rafters, with staggered seams to prevent weak lines across the roof. Each panel requires nails every six inches along edges and twelve inches in the field.
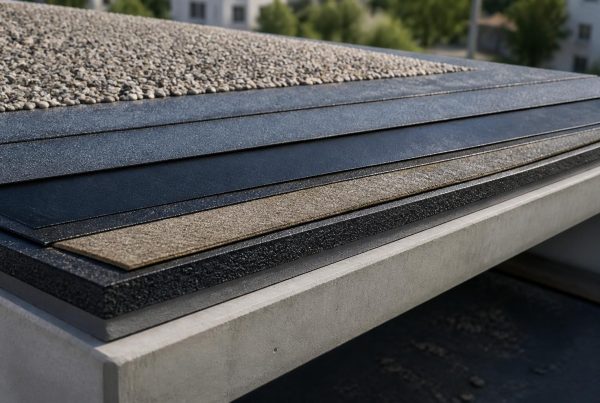
Underlayment Types and Applications
| Material Type | Best Use | Lifespan | Water Resistance |
|---|---|---|---|
| Asphalt felt (15 lb) | Low-slope budget builds | 15-20 years | Moderate |
| Synthetic (woven) | Steep slopes, high wind | 25-30 years | Excellent |
| Rubberized membrane | Valleys, ice dam areas | 30+ years | Superior |
| Self-adhering | Flashing, problem areas | 20-25 years | Excellent |
Synthetic underlayment has largely replaced felt paper in quality roofing construction. It tears less during installation, handles moisture better, and provides longer exposure time if weather delays the final roofing. The material costs more upfront but reduces callbacks and failures.
Ice and water shield, a self-adhering rubberized membrane, goes along eaves, in valleys, and around penetrations. In Eastern North Carolina, it's less about ice dams and more about wind-driven rain during storms. Many experienced contractors extend ice and water shield six feet up from the eaves rather than the minimum three feet code requires.
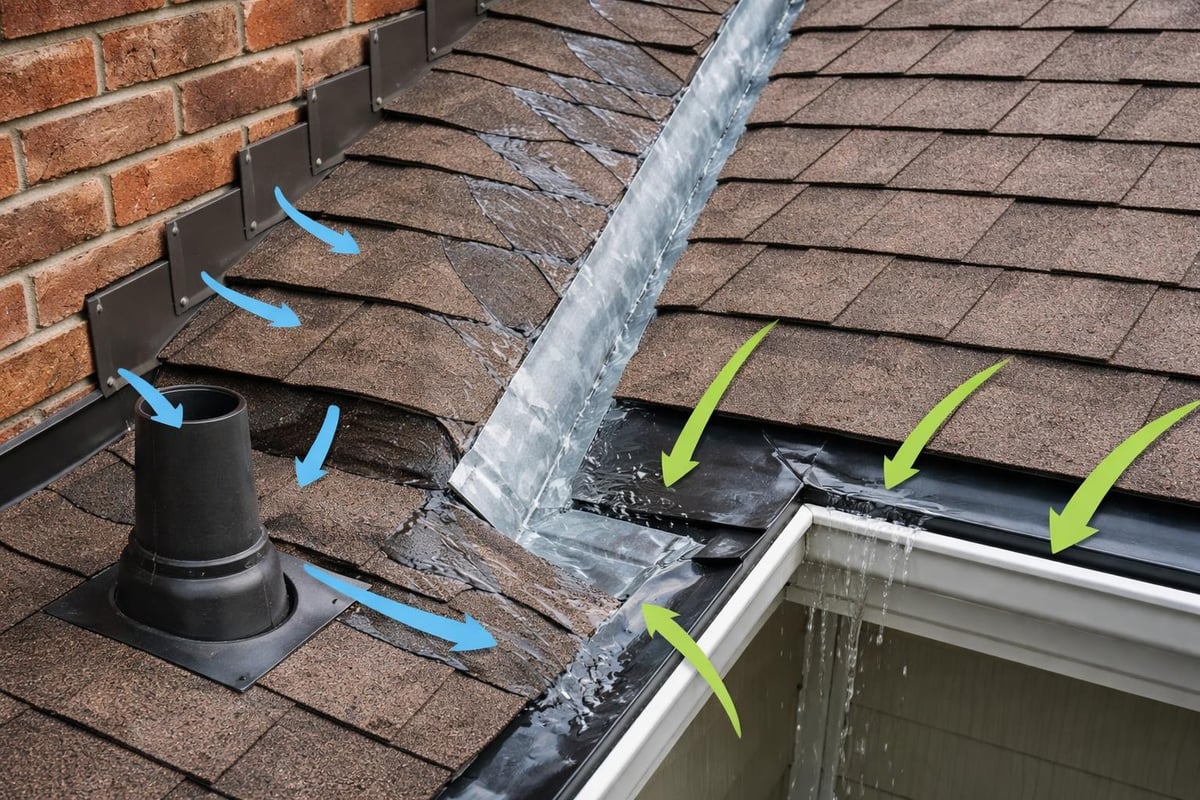
Flashing Installation and Water Management
Flashing directs water away from vulnerable joints and transitions. Without proper flashing, even the best roofing material fails. Step flashing works along walls and chimneys, with each piece overlapping the next like shingles. Valley flashing channels water from two roof planes into a single drainage path. Drip edge protects fascia boards and creates a clean edge for water to exit.
Critical flashing locations:
- Chimney bases and caps
- Plumbing vent boots
- Skylight perimeters
- Dormer valleys
- Roof-to-wall transitions
- Eave edges
Many roofing problems trace back to details that cause problems during the construction phase. A common issue: using too few fasteners on flashing, allowing wind to lift edges and let water underneath. Another frequent mistake involves cutting step flashing too short, which leaves gaps where siding meets roofing.
Valleys require special attention. Open valleys use metal flashing with roofing material cut back on both sides. Closed valleys weave or overlap shingles across the valley. Woven valleys look cleaner but trap debris more easily. In areas with heavy leaf fall, open valleys with quality metal flashing last longer and require less maintenance.
Roofing Material Selection and Installation
The choice of roofing material affects both the construction process and long-term performance. Asphalt shingles dominate residential work because they balance cost, durability, and installation speed. Metal roofing grows in popularity for its longevity and wind resistance. Tile and slate serve niche markets where aesthetics or extreme durability justify higher costs.
Installation Methods by Material
Asphalt shingles follow a bottom-to-top pattern with specific overlap requirements. Each shingle needs four to six nails placed in the nail zone, never too high or too low. Proper alignment prevents crooked rows that look bad and perform worse. Starter strips along eaves create the first seal, and ridge caps finish the peak with flexible shingles that bend over angles.
Metal panels require different techniques. Panels overlap and lock together, with concealed fasteners on most standing seam systems. Expansion and contraction matter more with metal, so installers leave gaps at panel ends and use clips that allow movement. Metal roofing construction moves faster than shingles but demands precision in measurements and cuts.
Tile and slate add significant weight, requiring stronger framing and decking. These materials last 50 to 100 years when installed correctly, but improper installation leads to cracked tiles and leaks. Each piece must be mechanically fastened, not just mortared, and underlayment must handle condensation since these materials don't breathe like asphalt.
Homeowners exploring different types of roofing materials should consider climate, budget, and home design. A Mediterranean-style home suits tile. A coastal property benefits from metal's corrosion resistance. A traditional colonial looks right with architectural shingles. The material choice affects roofing construction costs, timeline, and structural requirements.
Ventilation and Attic Air Flow
Proper ventilation might be the most overlooked aspect of roofing construction. Attic spaces need balanced intake and exhaust to prevent moisture buildup and excessive heat. Soffit vents provide intake along eaves, while ridge vents or gable vents exhaust hot air at the peak. The general rule: one square foot of ventilation for every 150 square feet of attic space.
Without adequate ventilation, summer attic temperatures reach 150 degrees or higher, cooking shingles from below and shortening their lifespan. Winter moisture from living spaces rises into cold attics, condensing on roof decking and framing. Over time, this leads to mold, rot, and structural damage that's expensive to repair.
| Ventilation Type | Location | Effectiveness | Installation Cost |
|---|---|---|---|
| Ridge vent | Roof peak | Excellent | Moderate |
| Soffit vent | Eave underside | Good (intake only) | Low |
| Gable vent | End walls | Fair | Low |
| Power attic fan | Roof or gable | Variable | High |
| Turbine vent | Roof surface | Good | Moderate |
Ridge vents paired with continuous soffit vents create the best air flow. The temperature difference between attic and outside air drives circulation naturally, without electricity or moving parts. Some contractors skip proper soffit installation to save time, relying only on ridge vents. This cuts effectiveness in half since air needs both entry and exit points.
During roofing construction, many builders focus on the visible layers and treat ventilation as an afterthought. This mistake shows up years later when homeowners face premature shingle failure or discover attic mold. Including proper ventilation from the planning stage prevents these issues and extends roof life significantly.
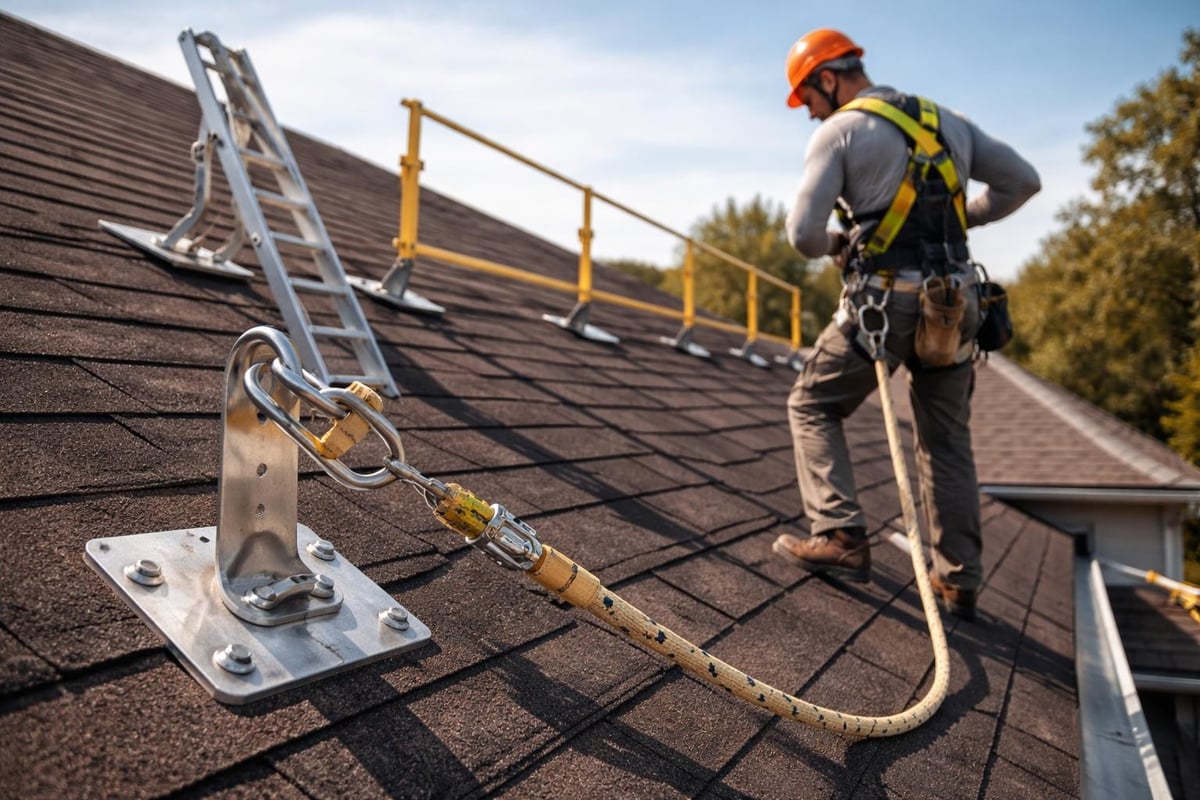
Safety Standards and Fall Protection
Roofing construction ranks among the most dangerous construction activities. Falls from roofs cause serious injuries and deaths every year, making safety equipment and procedures non-negotiable. OSHA residential fall protection guidance requires fall protection for any work above six feet, which includes most roofing projects.
Essential safety equipment:
- Personal fall arrest systems (harness, rope, anchor)
- Guardrail systems along roof edges
- Safety net systems for large projects
- Roof brackets and toe boards for steep slopes
- Non-slip footwear with good ankle support
Experienced roofing crews make safety part of the workflow, not an interruption. They set up fall protection before materials go on the roof. They inspect equipment daily for wear and damage. They maintain three points of contact on ladders and never work alone on steep or high roofs.
Homeowners hiring contractors should verify safety practices upfront. Ask about fall protection plans, worker training, and insurance coverage. A crew that dismisses safety questions or works without proper equipment poses risks to themselves and your property. The best practices for commercial roofing installations emphasize safety protocols that apply equally to residential work.
Weather conditions affect safety as much as equipment. Wet shingles become slippery. High winds make materials dangerous projectiles. Temperatures above 90 degrees increase heat exhaustion risks. Professional contractors monitor conditions and pause work when safety is compromised, even if it delays the project.
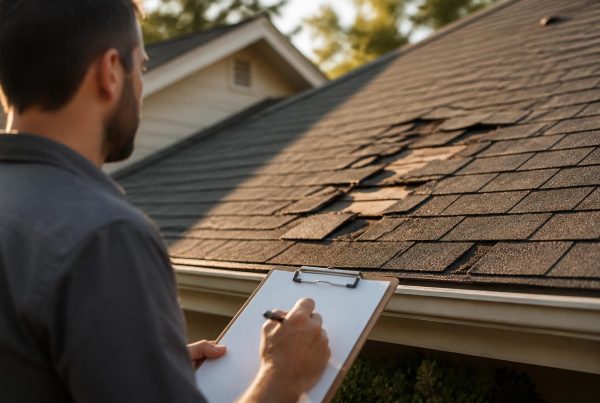
Quality Control and Common Mistakes
Quality roofing construction requires attention at every stage. Simple mistakes create long-term problems that cost far more to fix than preventing them during installation. Common roofing mistakes include improper nail placement, inadequate flashing, misaligned shingles, and skipped underlayment in hard-to-reach areas.
Nail placement determines how well shingles resist wind. Nails driven too high don't penetrate the shingle below, leaving it loose. Nails too low are visible and create leak points. Overdriven nails tear through shingles, while underdriven nails stick up and damage overlapping shingles. Pneumatic nailers need proper pressure adjustment for consistent depth.
Inspection Checkpoints During Construction
- After framing – Check rafter spacing, connections, slope consistency
- After decking – Verify panel spacing, nail patterns, smooth surface
- After underlayment – Inspect overlap amounts, fastener spacing, valley details
- During material installation – Monitor alignment, exposure, nail placement
- Final walkthrough – Review flashing, ridge caps, ventilation, cleanup
Homeowners in Eastern North Carolina dealing with roof issues should start with roof repair assessments that identify whether problems stem from installation errors or normal wear. Sometimes what looks like material failure actually traces to construction shortcuts taken years earlier.
Temperature affects roofing construction quality. Shingles installed in cold weather don't seal properly until warmer days arrive. In extreme heat, shingles become too pliable and tear easily during handling. The ideal installation temperature range is 45 to 85 degrees Fahrenheit. Working outside these ranges requires special techniques and materials.
Material Storage and Job Site Management
How materials are stored and handled affects roofing construction outcomes. Shingle bundles stacked in direct sunlight for weeks before installation may stick together or develop soft spots. Materials left uncovered during rain absorb moisture, adding weight and reducing performance. Proper staging keeps materials dry, accessible, and organized.
Job site best practices:
- Deliver materials close to installation date
- Stack bundles on flat, stable surfaces away from edges
- Cover materials with tarps if rain threatens
- Distribute weight evenly across roof structure
- Use plywood runways to protect newly installed sections
- Remove debris daily to prevent accidents
Large roofing projects generate substantial waste. Tear-off debris, packaging, cut pieces, and damaged materials add up quickly. Professional crews use tarps around the perimeter to catch debris, protecting landscaping and making cleanup easier. Dumpsters should be positioned for easy access without damaging driveways or lawns.
Tool management matters too. Magnetic sweepers pick up stray nails that damage tires or injure children and pets. Organized tool stations reduce time wasted searching for equipment. Cordless tools eliminate extension cord hazards. These details separate smooth roofing construction from chaotic job sites that frustrate everyone involved.
Working with Local Codes and Inspections
Building codes govern roofing construction to ensure minimum safety and performance standards. Local codes in Eastern North Carolina incorporate state requirements plus amendments addressing regional concerns like hurricane wind loads. Permits are required for most roofing work beyond simple repairs, and inspections verify compliance before projects close.
Code requirements typically address:
- Minimum underlayment specifications
- Fastener type and spacing
- Flashing installation methods
- Fire resistance ratings
- Ventilation requirements
- Ice and water shield application
Inspectors check work at specific stages. Some jurisdictions require inspection after decking but before underlayment. Others inspect once roofing material is complete. Failed inspections delay projects and require corrections before work can continue. Contractors familiar with local codes avoid these setbacks by building to specification from the start.
Homeowners should verify contractors pull proper permits and schedule required inspections. Unpermitted work creates problems during home sales and may void insurance claims after storm damage. The small permit fee is worthwhile insurance that work meets current standards. Resources like NC Roofs’ blog often explain local code changes and how they affect roofing projects.
Seasonal Considerations and Weather Planning
Roofing construction timing affects both quality and cost. Summer offers long days and predictable weather but brings extreme heat that challenges crews and materials. Fall provides ideal temperatures and low humidity but shorter daylight hours. Winter work requires careful planning around cold snaps and occasional ice. Spring weather is unpredictable, with frequent rain delays.
| Season | Advantages | Challenges | Best For |
|---|---|---|---|
| Spring | Moderate temps, contractor availability | Rain delays, pollen | Replacements |
| Summer | Long days, fast curing | Extreme heat, afternoon storms | New construction |
| Fall | Ideal temps, dry conditions | Shorter days, leaf buildup | All projects |
| Winter | Lower labor costs | Cold limits materials, short days | Emergency repairs |
Weather monitoring tools help contractors plan work windows. Radar apps show approaching storms hours in advance. Temperature forecasts guide material delivery timing. Wind alerts prevent working in dangerous conditions. Even with planning, unexpected weather delays projects, so flexible timelines reduce stress for everyone involved.
Eastern North Carolina's climate means planning around hurricane season from June through November. Starting major roofing construction in July risks storm interruptions and material damage. Many experienced homeowners schedule projects in late winter or early spring to finish before storm season begins. Regular maintenance helps roofs survive storms better regardless of age.
Long-Term Performance and Maintenance Planning
Quality roofing construction extends beyond installation day. How homeowners maintain their roof determines whether it reaches its expected lifespan or fails prematurely. Simple maintenance prevents small issues from becoming expensive repairs. Annual inspections catch problems early when fixes are straightforward and affordable.
Maintenance tasks by frequency:
Twice yearly:
- Clean gutters and downspouts
- Check for loose or damaged shingles
- Inspect flashing around penetrations
- Remove debris from valleys
Annually:
- Professional inspection of entire system
- Attic ventilation check
- Soffit and fascia condition review
- Tree trimming to prevent branch damage
As needed:
- Moss or algae treatment
- Storm damage assessment
- Seal replacement around vents
- Minor repairs before they spread
Many roofing construction warranties require documented maintenance to remain valid. Skipping inspections or letting small problems grow may void coverage when major issues develop. Keep records of all maintenance, repairs, and inspections in a dedicated file. This documentation helps during insurance claims and adds value when selling your home.
Understanding eco-roofing solutions helps homeowners balance performance with environmental impact. Cool roofing materials reflect more sunlight, reducing cooling costs. Recyclable materials minimize landfill waste. Improved ventilation and insulation reduce energy consumption year-round. These considerations belong in the planning stage, not as afterthoughts.
Roofing construction success depends on proper planning, quality materials, skilled installation, and ongoing maintenance. Whether you're building new or replacing an existing roof, understanding these fundamentals helps you make informed decisions and avoid costly mistakes. If you're in Eastern North Carolina and need guidance on your roofing project, NC Roofs offers honest assessments, clear pricing, and straightforward recommendations focused on what your home actually needs.